Blog

Google Chrome’s Unexpected Growth

Google Chrome’s Unexpected Growth

I was cleaning up the drive on my MacBook Pro earlier in preparation for an overseas consulting trip and noticed that my copy of Google Chrome was taking a ridiculous amount of drive space.  I use Safari almost exclusively but keep copies of Chrome, Firefox, OmniWeb and a few other browsers around for compatibility testing.

Chrome was taking up 11.5 GB on my disk.  I checked a newly download version and it was only 127 MB.  The version on my disk was over 90 times larger than it should be.

It turns out that Google Chrome keeps copies of every old version of itself when it updates to a new one.  It also doesn’t do any housekeeping by removing older versions after a period of time.  My copy had accumulated 98 different versions of itself, going back to 8/22/2011.

The easy fix is to delete your old copy and download a new one from Google’s site here: google.com/chrome/

If you prefer, you could view the contents of the application package and delete all of the old versions but that doesn’t really save you any time.

It’s really not a great idea to allow an application that you develop to grow in size this way without letting your users know what’s happing and giving them a way to control it.  What do you think?


Google Apps Account Setup Instructions for Macs and iOS

Google Apps Account Setup Instructions for Macs and iOS

We are often asked about setting up Google Apps accounts in Mac Mail, on iPads and iPhones.

Here are the basics, assuming you’re running a current version of Mac OS and that your iOS device is updated.

Mac Mail:

  1. On your Mac, launch Mail.app
  2. Go to the Mail menu and select Preferences
  3. Select the Accounts tab from the toolbar and click on the “+” icon in the bottom-left corner of the window
  4. Enter your Name, Google Apps email address (ie: phil@mydomain.com) and your password, click Continue.
  5. At this point, you MAY be presented with an Account Summary page, indicating an account type of Gmail IMAP.  If not, follow the instructions on steps 5(a) through 5(g).  Otherwise, your Mac has autodiscovered the appropriate server settings.  You may allow it to set up your Google Apps account in Notes, Calendars & Reminders and Messages as well, if you would like.  Click Create.  Skip to step 7.
  6. If your account did not set up automatically, follow these steps:
    • Make sure the Account Type is set to IMAP
    • Set the Incoming Mail Server to imap.gmail.com
    • Set the User Name to your full email address (ie: phil@mydomain.com)
    • Enter your password and click Continue
    • Set the Outgoing Mail Server to smtp.gmail.com
    • Select Use Authentication
    • Set the User Name to your full email address (ie: phil@mydomain.com)
    • Enter your password and click Continue
    • You should see an Account Summary page.  click Create
  7. Select the account that your Mac just created and choose the Mailbox Behaviors tab.
  8. Under normal circumstances, only the Move deleted messages to the Trash Mailbox item should stay checked.  Uncheck everything else.  Choose a retention policy for your deleted messages – one month is typical.
  9. Close the Mail Preferences window

iOS Setup:

  1. On your iOS devices, go to Settings
  2. Select Mail, Contacts, Calendars
  3. Select Add Account…
  4. Select Microsoft Exchange (Other choices will work but this is the preferred option unless you’re using a free Google Apps account, in which case you would select Google instead)
  5. Set the Email to your full email address
  6. Enter your Password and a description
  7. Select Next from the upper-right corner of the screen
  8. Set the Server to m.google.com
  9. Leave the Domain blank
  10. Set the Username to your full email address
  11. Enter your Password and a description
  12. Unless you plan to sync your contacts and calendars from Google turn those sliders OFF.  Leave the Mail slider ON.
    1. IF you want to sync your calendar(s) with Google, leave the calendar slider ON.
    2. Once the account is set up, go to https://m.google.com/sync/settings on your iOS device to choose which calendars to sync.
  13. Select Save from the upper-right corner of the screen
  14. Scroll down and make sure that the Default Account in the Mail section is set to your preferred Mail account

If these instructions were helpful to you or if they don’t help you get your Mail set up correctly let us know!


Slick little phishing email

Slick little phishing email

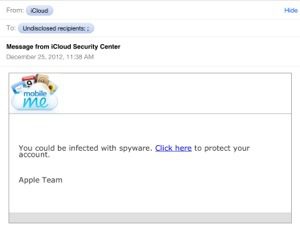
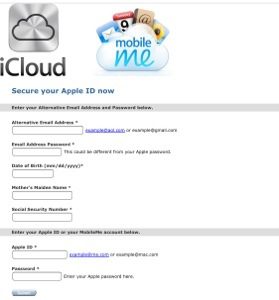
There’s a new phishing email going around, targeted at Mac users. It’s not real, don’t give them any of your information. A couple of screen captures below:

This is typical of the kinds of attacks targeting Mac and iOS users more and more these days. As mentioned in a previous post, these are “social engineering” attacks that don’t have the ability to bypass any of the security built-in to MacOS or iOS. Instead, they try to mimic the look of a legitimate e-mail and/or website to trick users into giving them personal information, passwords, or financial information. Often they re-purpose graphics from the legitimate site in order to make their counterfeit more convincing.

The key to avoiding getting taken advantage of by these types of attacks is to go directly to the legitimate site in your web browser, not by clicking on a link, but by typing the URL in to your browser directly (in this case it would have been apple.com.) If there is actually a security issue you would be notified once you are logged into your account.

If you ever have any questions about the authenticity of an email or website, you can always look at the URL itself in the top of your browser window. If it doesn’t contain the exact URL of the site that you intended to be visiting, close the window and type the URL in a new window by yourself.

You should note that Apple’s built-in defense software will likely block the URL mentioned in the above email shortly if you’re running the current OS, protecting users from inadvertently giving away their information!

Have you seen an increase in these kinds of attacks recently? Have tips to share to help users avoid being tricked? Have questions about what to do if you think you may have made a mistake? Let us know!


Macintosh Security: Phishing & Trojans & Rogueware, Oh, My!

Macintosh Security: Phishing & Trojans & Rogueware, Oh, My!

Everyone has heard that computers running the Mac OS X don’t have the same problems with viruses that plague many Microsoft Windows machines.  Mac OS X itself  is designed with technologies and layers of built-in security that provide protection against most malicious software (malware) and security threats right out of the box.

Even with all of its built-in protections, however, there are still a few kinds of security threats that Mac users need to be aware of and guard against!  The recent appearance of a clever fake security program specifically aimed at Mac users makes this a great time to review potential threats.

“MacDefender” (or “Mac Security”, or “MacProtector” …)

The most specific, critical and time-sensitive warning that we can give you at this point is not to install a software package called MacDefender. MacDefender is a very polished Trojan Horse or Rogueware (we’ll go over what that means later in this post) that is apparently being delivered primarily through fake Google image search results at the moment.  There are many detailed reports of what it does and how it works and I’ll link to some of those at the bottom of this post.

The short version is that you’re browsing the Internet and you end up on a site that starts warning you that your Mac has viruses.  If you click anywhere on the page your Mac downloads and tries to automatically install a software program named BestMacAntivirus2011.mpkg.zip.  It will require your password to install – if you don’t give it your password it can’t do anything.  Don’t give it your password.  Close the web page, even if it warns you that you won’t be protected from viruses.

At this point, Safari is automatically blocking most known sources of MacDefender with a warning about malware.

Update:  the “MacDefender” package has been updated and may have different names including, but not limited to, “Mac Security” and “MacProtector”.  They all work the same way.

Social Engineering

MacDefender fits in the broad category of security threats that use Social Engineering.  Social Engineering, from a technology perspective, is the act of manipulating people into providing confidential information or into performing actions that allow a program access to privileged information or resources.  Basically, it’s today’s version of a “con” or “confidence game.”

In any type of Social Engineering trick, the goal is to get you to think that the request for information or actions that you have been directed to take are legitimate.  Their focus is not on technical vulnerabilities in your computer or your software but, ironically, on your very fear of theft, viruses and intrusion.  Coupled with the average user’s lack of in-depth knowledge of technology it’s not surprising that some of these tricks are quite successful at getting at our information.

The best way to thwart social engineering tricks to to be aware of them.

Phishing

Phishing is the official name for all of those emails that you get that are trying to get information about your bank accounts, usernames, passwords, credit cards, etc.  Sometimes they’re easy to spot – full of bad grammar and misspellings or promises of large sums of money.  Recently we’ve seen much more sophisticated versions, however, that try hard to look like legitimate email from your bank, PayPal, eBay, etc.  Phishing emails are pretty easy to avoid, however.  If you get an email that looks like it’s from your bank, don’t click any links in the email.  Instead, go to your web browser and access your bank’s site as you normally would – by using one of your bookmarks or by typing in the URL manually.  If there’s something you need to do they’ll let you know once you log in there.

Trojan Horse

A trojan horse is malware that masquerades as real software.  The name is derived from that of the original Trojan Horse and the intent is the same – to trick you into ushering it through your walls by pretending to be something positive.

An example of a true mac trojan horse was the “AS.MW2004.Trojan” discovered in 2004.  This was a VERY small program available on peer-to-peer file sharing networks that tried to pass itself off as a free installer for a pirated version of Microsoft Office 2004 for Mac OS X.  If you downloaded, installed and ran the trojan it would attempt to delete all of your documents.

Preventing a trojan horse from getting into your Mac is not too challenging.  Only get your software from legitimate sources and be especially wary of software you didn’t intentionally download.

Rogueware and Scareware

Rogueware like MacDefender is rogue security software.  It is typically classified as a particular type of trojan horse that masquerades as software to protect or clean your computer.  This type of software is also often referred to as scareware as it tries very hard to scare you into installing it by telling you that your computer is already infected with other kinds of malware.  If you ever have any doubts about installing a piece of software, ask an expert!

Resources

Here are some descriptions of how the MacDefender rogueware works.

TidBITS Safe Computing: Beware Fake MACDefender Antivirus Software

New ‘MACDefender’ Malware Threat for Mac OS X – Mac Rumors

Update:  Intego has posted a nice video showing the curious exactly how the MacDefender rogueware looks to the end-user.  See it at:

Update: Apple has published a KnowledgeBase article on MacDefender and how to remove it.  A MacOS Update is due soon with built-in protection.

If you think you have been compromised with it, be sure to let a Mac consultant know!  Its very easy to remove but if you give it your credit card number you’ll need to do some extra work to protect your finances.

Have you encountered any Macintosh Malware?  Do you use any Mac security software?  Let us know in the comments!


Kicking Apple Mail Up a Notch

Kicking Apple Mail Up a Notch

Apple’s built-in Mail client is great for most users “as is”, but some small business operators may want additional functionality and features.  Staying organized, managing your email and Getting Things Done can all be more efficient by adding features through Mail’s plugin architecture.  Here are a few of our favorite tools:

MsgFiler

This is a small, popular plugin that offers pretty much everyone a quick boost to workflow efficiency.  It only does one thing — with a single keystroke you can bring up a window to quickly file messages into any one of your mail folders.  Believe it or not, this is a huge timesaver compared to drag and drop, especially when you’re working on a laptop and have that trackpad to contend with instead of a mouse.

Unlike Mail’s built-in smart mailboxes functionality, which allows you to view your email based on certain criteria, MsgFiler lets you file any selected messages quickly and easily.  The plugin is shareware — your $8 purchase price removes the initial alert when using the application.

Mail Act-On

Mail allows you to define rules that are applied when a message is received.  Mail Act-On takes email management a step further — by allowing you to define keystroke combinations that will perform any action you’ve defined on a particular message.  Do you regularly forward messages to an assistant or colleague?  Move messages to an application such as OmniFocus?  Post them on a company website?  Log them into a trouble ticket system?  With Mail Act-On you can automate any of these actions (and any others you can dream up) with a single keystroke.  This is great for GTD and “Inbox Zero” adherents who maintain ACTION and ARCHIVE folders and invariably assign emails to one or the other as they read them.  It’s easy to set up without getting a programmer involved, and the developer offers lots of great tutorials.  Mail Act-On is free for 30 days and then $24.95 to register.

MailTags

If you’ve ever appreciated the ability of Outlook or Entourage to associate messages with projects, add comments and other tags to email messages, you’ll love the MailTags plugin.  Offered by the same developer as Mail Act-On, this plugin easily and efficiently allows you to tag messages with projects, comments, etc., and to find your added metadata with Spotlight.  You can add reminders, contexts (great for GTD) and due dates, then create smart mailboxes for any of the tags you’ve created.  Mail Tags will also automatically apply tags from earlier messages when you get new emails in the same thread.  It integrates with EagleFiler, OmniFocus and DevonThink so that when you move a message into one of those applications the tags remain in place.  MailTags is free for 30 days and then $29.95 to register.

Bonus Tip

Speaking of email productivity, we wanted to offer one other tip that’s saved us hours.  Do you ever deal with clients or vendors whose mail servers keep packaging their messages to you as winmail.dat files?  Invariably the solution offered by the client is for you to work with their IT department to get the problem fixed — typically a real time suck.  A simple solution?  TNEF’s Enough, a little utility that easily decodes these attachments.  Simply save the winmail.dat file to your Desktop, launch TNEF’s Enough and open the winmail.dat file from the utility’s File menu.  Ta da!  You get a readable attachment and don’t have to waste your time pestering your client.  TNEF’s Enough is freeware.

More Plugins and Resources

Hawk Wings is a great place to find plugins, tips and other helpful add-ons for Apple Mail.  All of the plugins we’ve discussed in this post are listed on this site, as well as many others, all with a nice description of what they do.

Have you found other tools that increase your productivity with Apple Mail?  Let us know in the comments!


Easy Calendar Sharing for Small Businesses

Easy Calendar Sharing for Small Businesses

While the use of shared calendars can be a huge benefit to the workflow of small businesses, many options aren’t really a good fit for them. In this post we review some of the options and offer one approach that has worked for many of our clients and may be a good fit for your business as well. NOTE: We will be updating this post to accommodate newer technologies in Mac OS X 10.7 (Lion) as well as changes to Apple’s MobileMe service.
Why Integrate Calendars

Shared calendars can allow all members of an organization — or a team within an organization — to create, view, edit and share appointments without having to send a flurry of emails and invitations back and forth. If set up properly, a solution can work well with your existing workflow, integrate with a variety of mobile platforms, and allow team members to access the group’s calendars from any location, with any device, and keep the entire team in sync in real time.

This is particularly important when the schedules of multiple users need to be considered — team meetings, client presentations, and appointments that require the presence of another team member. Having access to a shared, up-to-date calendar allows everyone to confidently schedule appointments without having to check with HQ or risk having to reschedule due to conflicts.

Common Approaches and Challenges

It seems that most of our clients interested in shared calendars have tried one of two approaches: Using Apple’s own MobileMe service, or using a program management or CRM solution such as Basecamp or Daylite that include shared calendaring as part of their feature set.

MobileMe, offered by Apple, is a simple solution for wirelessly sharing calendars and other information among multiple devices (such as an iPhone, iPad, Mac or PC). For $100 a year you can keep all of your information in sync.

Many small businesses attempt to use MobileMe to share calendars — by syncing multiple computers and mobile devices to the same account. While economical and practical for personal use, this approach has a number of shortcomings for small businesses:

  • Personal vs. Shared Calendars: With MobileMe, it’s all or nothing — you aren’t able to maintain a personal calendar on your computer and share a business calendar with other team members in a read/write format.
  • Data Loss: We have seen a number of issues with data loss or corruption when organizations try to sync too many devices with MobileMe.

Solutions such as Basecamp, Daylite and other sophisticated tools undoubtedly offer great options for calendar sharing (and many other great functions for small businesses as well). But for some small businesses these tools include features they simply don’t want — task assignment, project scheduling, collaboration, etc. — and may seem more like using a bazooka when all you need is a flyswatter.

Many of our clients just want a reliable, simple, effective, no-frills option for sharing calendars — one that allows them to maintain their current workflow and use tools their employees already know.

Our Solution: BusyCal by BusyMac.

BusyCal is a simple program that allows you to sync with Google Calendar and share calendars on a LAN. It allows users to maintain their own personal calendars and also share group calendars with their teams. Although it replaces iCal with its own calendar, the interface is virtually identical — making it easy for your employees to make the switch without retraining. It integrates seamlessly with bonjour, iPad/iPhone (via iTunes or MobileMe), offers helpful features such as recurring To-Dos and sticky notes that can be shared with others on your network, and lots of options for customizing fonts, styles and colors.

Hosting the calendars at Google has the added safeguard of ensuring that if any user accidentally deletes a calendar on their local machine, the calendar will still exist in Google Calendars. In fact, calendars can’t be deleted on individual machines, they must be deleted on the Google site. BusyCal also has the ability to automatically back up your calendars on a schedule that you specify, making recovering from accidental appointment deletions refreshingly easy.

How to get started with BusyCal:

  • Create one or more free Google Calendar accounts. (You can have everybody share one, but then if you need to exclude a user down the line you’ll need to change the password to restrict access. We usually recommend creating one per user so that you can selectively share/unshare and give everybody customized access to the calendars they need.)
  • Back up your existing calendar data and export it in an iCal or CSV format.
  • Import your existing calendar data into your Google Calendar account on the Google site. You can also import data from Entourage, Outlook or other calendar applications you may be using.
  • Install BusyCal on every user’s machine. Then use its Google Integration function to link it to their Google Calendar account (or the single shared account if you decided to go that route).
  • Sync to your Google calendar account.
  • BusyCal will now keep your changes — and anyone else’s — up to date. You can access your calendar locally through BusyCal, or on the web in your Google Calendar account. Your iPhone or iPad can interact directly with Google Calendar as well, ensuring that you’re up-to-date no matter where you are. BusyCal will automatically track who last edited a particular appointment.

With BusyCal you can still maintain personal calendars on your own machine that aren’t part of your shared Google Calendar account, and you can still use MobileMe for two-way syncing of your data.

If you want to keep using iCal instead of BusyCal, BusyMac also makes a little program called BusySync that will keep your iCal and Google Calendars up to date without requiring that a particular application has to be open. BusyCal must be open for syncing to take place.

Have you found another shared calendaring approach that works for your business? Please let us know!